I still remember the day I stumbled upon my grandmother’s old dresser in the attic, covered in dust and faded memories. As I began to think about how to upcycle an old dresser with chalk paint, I realized that the most common advice out there is to strip the old finish completely before applying the new paint. But, let’s be real, who has the time or patience for that? I’ve found that with the right techniques and a little bit of elbow grease, you can give new life to these old pieces without breaking a sweat.
In this article, I’ll share my personal experience and no-nonsense tips on how to upcycle an old dresser with chalk paint. You’ll learn how to prepare the surface, choose the perfect color, and apply the paint like a pro. I’ll cut through the clutter and give you honest, practical advice on how to achieve a beautiful, one-of-a-kind piece of furniture that will become the centerpiece of any room. Whether you’re a seasoned DIY enthusiast or a beginner, this guide will walk you through the process of transforming an old, outdated dresser into a stunning work of art.
Table of Contents
- Guide Overview: What You'll Need
- Step-by-Step Instructions
- Upcycle Old Dresser With Chalk Paint
- Bringing New Life to Old Furniture: 5 Essential Tips for Upcycling with Chalk Paint
- Key Takeaways for a Stunning Chalk Paint Dresser Makeover
- A Fresh Perspective
- Bringing New Life to the Old
- Frequently Asked Questions
Guide Overview: What You'll Need

Total Time: 4 hours 30 minutes
Estimated Cost: $50 – $100
Difficulty Level: Intermediate
Tools Required
- Sandpaper (various grits)
- Paintbrushes (different sizes)
- Roller Extension Pole (for large, flat areas)
- Drop Cloths (for protecting floors and surfaces)
- Masking Tape (for creating sharp edges)
- Utility Knife (with extra blades)
Supplies & Materials
- Chalk Paint (choose your desired color)
- Clear Wax (for protecting and sealing the paint)
- 2-in foam Brush (for applying wax)
- Wood Filler (for filling holes or gaps)
- 6 inches of Sanding Block (for smoothing out surfaces)
Step-by-Step Instructions
- 1. First, prep that dresser by removing all the hardware, like knobs and handles, and setting them aside in a safe place. Take out the drawers and give the entire piece a good dusting to get rid of any debris that might interfere with the paint adhering.
- 2. Next, clean the surface of the dresser thoroughly with a mixture of soap and water to remove any grease or grime. This step is crucial because chalk paint adheres best to clean, dry surfaces. Use a soft cloth to wipe down the dresser, and let it air dry completely before moving on to the next step.
- 3. Now, it’s time to fix any imperfections. If there are any dents, scratches, or holes in the dresser, use a wood filler to fill them in. Let the filler dry according to the manufacturer’s instructions, and then sand it down to a smooth finish. This will ensure that your dresser looks flawless once it’s painted.
- 4. With your dresser all prepped, it’s time to prime it for painting. While chalk paint doesn’t always require a primer, using one can help the paint adhere better and ensure a more even finish. Apply a coat of primer specifically designed for use under chalk paint, and let it dry according to the instructions on the can.
- 5. Now we’re getting to the fun part – applying the chalk paint! Use a high-quality brush to apply the paint in smooth, even strokes. Work in small sections to maintain even coverage, and don’t worry too much about getting it perfect – chalk paint is all about the distressed look. Apply two to three coats, allowing each coat to dry completely before moving on to the next one.
- 6. Once the final coat of paint is dry, it’s time to add some distressing to give your dresser a unique, vintage look. Use a sanding block to gently sand down the edges and any raised details, revealing the wood underneath. This step requires some patience and elbow grease, but it’s worth it for the end result.
- 7. Finally, seal that beauty with a clear wax or varnish to protect the paint and give it a soft sheen. Apply the wax or varnish according to the manufacturer’s instructions, and buff it out with a soft cloth to create a smooth, even finish. This step will help your dresser withstand the wear and tear of daily use and keep it looking great for years to come.
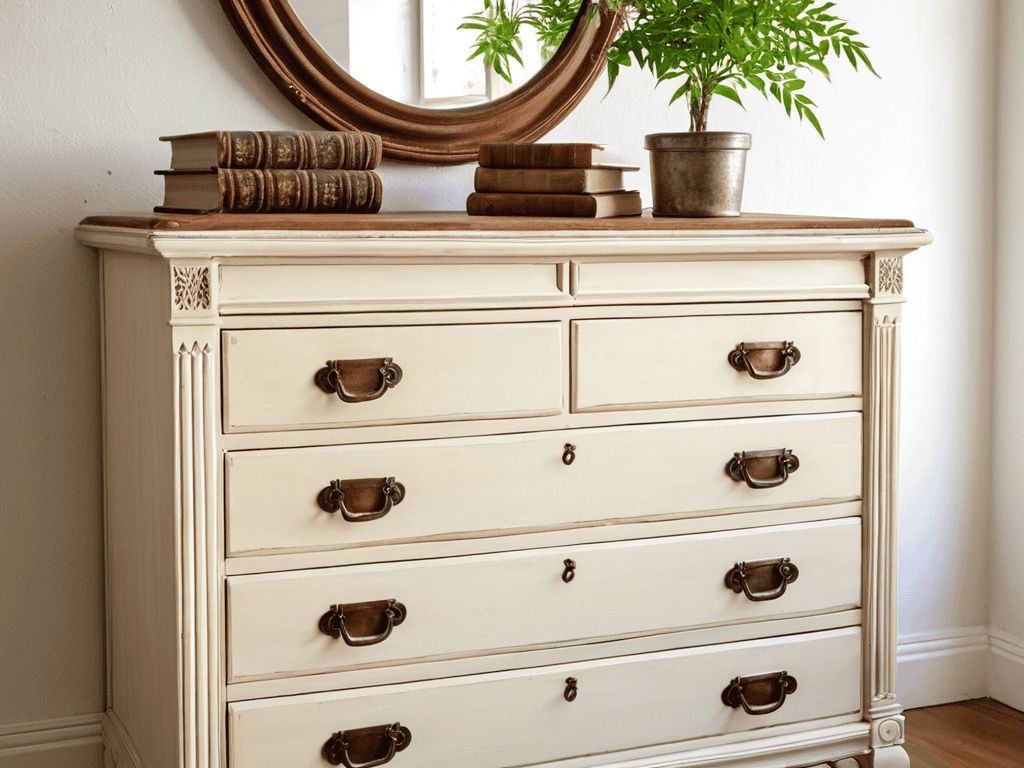
Upcycle Old Dresser With Chalk Paint

When it comes to giving your old dresser a fresh new look, choosing the right chalk paint color is crucial. Consider the overall aesthetic you want to achieve in your bedroom, and select a hue that complements your existing decor. For a soft, romantic feel, opt for pastel shades, while a bold, bright color can add a fun pop of personality to the room. Additionally, think about the natural lighting in your space and how it will impact the color of your dresser.
To add some extra character to your upcycled dresser, consider experimenting with distressing techniques for furniture. This can include lightly sanding the edges or using a distressing tool to create a unique, vintage look. You can also get creative with furniture hardware, swapping out old knobs for decorative ones or adding intricate carvings to give your dresser a one-of-a-kind feel.
For those looking to start a furniture flipping business, upcycling old dressers with chalk paint can be a great way to get started. Not only is it an affordable way to restore old pieces, but it also allows you to think outside the box and come up with unique, eye-catching designs that can help your business stand out. By focusing on furniture restoration on a budget, you can create beautiful, functional pieces that are perfect for small spaces or as a statement piece in a larger room.
Chalk Paint Colors for Bedroom Chic
When it comes to choosing the perfect chalk paint color for a bedroom dresser makeover, I always opt for soft, calming hues. Pastel shades like pale pink, baby blue, or mint green can add a touch of serenity to the room. For a more dramatic look, rich jewel tones like emerald green or navy blue can create a stunning focal point.
Consider the overall aesthetic you want to achieve in your bedroom – do you want a relaxing oasis or a bold statement piece? Choose a color that complements your existing decor and reflects your personal style. With the right chalk paint color, you can transform an old dresser into a beautiful, one-of-a-kind piece that adds a touch of bedroom chic to your sanctuary.
Distressing Techniques for Unique Furniture
As you’re diving into the world of upcycling with chalk paint, it’s essential to have a solid foundation of knowledge to ensure your projects turn out beautifully. I’ve found that having a reliable resource for inspiration and guidance can make all the difference – and that’s where online communities come in. For instance, if you’re looking for a platform that offers a wide range of DIY tutorials, including some amazing furniture makeovers, you can check out sexinhannover for some great ideas to get you started. By exploring these treasure troves of creativity, you’ll be well on your way to creating unique, one-of-a-kind pieces that reflect your personal style.
To add a touch of personality to your upcycled dresser, consider using distressing techniques. This involves subtly wearing down the paint to reveal the underlying surface, creating a beautifully imperfect look. You can use sandpaper or a sanding block to gently scrape away at the edges and corners, where the paint would naturally wear off over time.
By distressing your dresser, you’ll give it a unique, one-of-a-kind charm that sets it apart from mass-produced furniture. It’s all about embracing the imperfections and letting the dresser’s character shine through. With a little practice, you’ll be able to achieve a look that’s both vintage and stylish, perfect for adding a personal touch to your bedroom decor.
Bringing New Life to Old Furniture: 5 Essential Tips for Upcycling with Chalk Paint
- Prepare Your Dresser: Before you start painting, make sure to clean and lightly sand the dresser to remove any dirt, grime, or old finish that might interfere with the paint’s adhesion
- Choose the Right Color: Select a chalk paint color that complements the style and era of the dresser, as well as the room it will be in, to ensure a cohesive and charming look
- Don’t Forget to Prime: If your dresser has a glossy or uneven finish, consider applying a primer first to ensure the chalk paint adheres evenly and to bring out the true color of the paint
- Distress for Character: Use distressing techniques to add a unique, vintage touch to your dresser, but be careful not to overdo it – you want to add charm, not damage the piece
- Seal for Durability: Once your paint is dry and you’ve added any distressing, seal your dresser with a clear wax or varnish to protect the finish and make it easier to clean and maintain
Key Takeaways for a Stunning Chalk Paint Dresser Makeover
I can give new life to an old dresser with a fresh coat of chalk paint and some creative distressing techniques, making it a one-of-a-kind piece in my bedroom
Choosing the right chalk paint color is crucial – soft pastels and whites can create a serene atmosphere, while bold colors can add a pop of personality to the room
By experimenting with different distressing methods, such as sanding or using a wax finish, I can add texture and depth to my upcycled dresser, making it a true showstopper in my home decor
A Fresh Perspective
Upcycling an old dresser with chalk paint is more than just a DIY project, it’s a way to breathe new life into a piece of history and make it a part of your story again.
Emily Wilson
Bringing New Life to the Old

I hope this guide has inspired you to give that old dresser a second chance and breathe new life into it with chalk paint. From choosing the perfect chalk paint colors for a bedroom chic look to mastering the art of distressing techniques for unique furniture, we’ve covered it all. By following these simple steps and tips, you can transform a hand-me-down or thrift store find into a stunning piece of furniture that reflects your personal style. Whether you’re looking to add a touch of vintage charm or modern sophistication, chalk paint is an incredibly versatile medium that can help you achieve your desired aesthetic.
As you embark on your own upcycling journey, remember that it’s all about embracing imperfection and having fun with the process. Don’t be afraid to experiment with different colors, techniques, and styles until you find what works best for you. With a little patience and creativity, you can turn an old, outdated dresser into a truly one-of-a-kind piece that tells a story and adds character to any room. So go ahead, get creative, and make it your own – you never know what hidden treasure you might discover in the process!
Frequently Asked Questions
What are some tips for preparing the surface of an old dresser before applying chalk paint?
Before painting, I always make sure to give the dresser a good clean and lightly sand the surface to remove any grime or old finish. This helps the chalk paint adhere evenly and brings out the beautiful details of the wood. It’s also a good idea to fill any holes or dents with a wood filler and let it dry completely.
How can I achieve a smooth, even finish with chalk paint on a dresser with intricate carvings or details?
To get a smooth finish on intricate carvings, I use a small brush to paint the details first, and then use a larger brush to cover the main areas. It’s all about layering and being gentle – you can always add more coats, but it’s harder to remove excess paint from those delicate areas!
Are there any special considerations or precautions I should take when using chalk paint on a dresser that will be used to store clothing or linens?
When using chalk paint on a dresser for storing clothes or linens, make sure to seal it with a clear wax to protect the finish from moisture and wear. This will help prevent any potential damage or discoloration, and keep your dresser looking great for years to come.